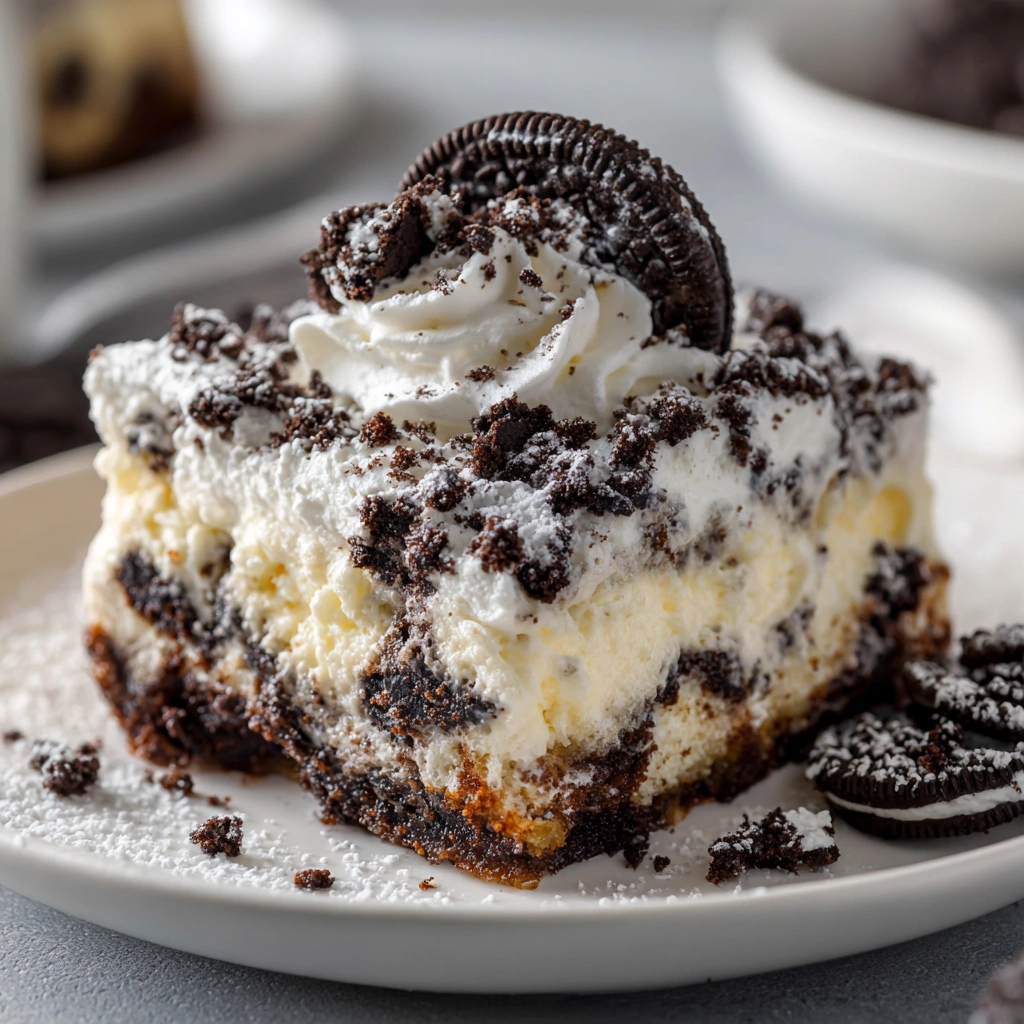
Introduction to Easy Easter Oreo Cookie Casserole
As Easter approaches, I find myself searching for delightful treats that are both simple and impressive. That’s where my Easy Easter Oreo Cookie Casserole comes in! This dessert is a quick solution for busy days, allowing you to whip up something special without spending hours in the kitchen. With layers of creamy goodness and crunchy Oreos, it’s sure to be a hit with family and friends. Plus, it’s a no-bake recipe, which means less mess and more time to enjoy the holiday festivities. Trust me, this is a dish you’ll want to share!
Why You’ll Love This Easy Easter Oreo Cookie Casserole
This Easy Easter Oreo Cookie Casserole is a dream come true for busy moms and professionals alike. It’s incredibly easy to make, taking just 20 minutes of prep time. The layers of rich cream cheese and crunchy Oreos create a delightful contrast that will have everyone coming back for seconds. Plus, it’s a no-bake dessert, so you can spend more time with your loved ones and less time in the kitchen!
Ingredients for Easy Easter Oreo Cookie Casserole
Gathering the right ingredients is the first step to creating this delightful dessert. Here’s what you’ll need for your Easy Easter Oreo Cookie Casserole:
- Oreo cookies: The star of the show! These chocolatey cookies add a crunchy texture and rich flavor.
- Whipped cream: This light and airy ingredient gives the casserole a fluffy texture, making each bite feel indulgent.
- Cream cheese: Creamy and tangy, it forms the base of the filling, providing a delicious contrast to the sweetness of the Oreos.
- Powdered sugar: This sweetener blends smoothly into the cream cheese, ensuring a sweet and creamy filling.
- Milk: A drizzle of milk adds moisture to the top layer, enhancing the overall creaminess of the dish.
- Vanilla extract: A splash of this aromatic ingredient elevates the flavor profile, making it even more delightful.
For a festive touch, consider adding colorful sprinkles on top before serving. If you’re looking for alternatives, you can use low-fat cream cheese or sugar-free whipped cream to lighten things up. You can find all the exact measurements at the bottom of the article, ready for printing!
How to Make Easy Easter Oreo Cookie Casserole
Now that you have your ingredients ready, let’s dive into the fun part: making your Easy Easter Oreo Cookie Casserole! Follow these simple steps, and you’ll have a delicious dessert that will impress everyone.
Step 1: Crush the Oreos
Start by crushing half of the Oreo cookies. You can place them in a zip-top bag and use a rolling pin to break them into small pieces. This is a great way to relieve stress, too! Set the crushed Oreos aside for later.
Step 2: Prepare the Cream Cheese Mixture
In a mixing bowl, combine the cream cheese, powdered sugar, and vanilla extract. Use a hand mixer or a whisk to blend until the mixture is smooth and creamy. This step is crucial for achieving that luscious filling that pairs perfectly with the Oreos.
Step 3: Fold in the Whipped Cream
Next, gently fold in the whipped cream. Use a spatula to incorporate it without deflating the mixture. This will keep your filling light and airy, making each bite feel like a cloud of sweetness!
Step 4: Layer the Ingredients
Now it’s time to assemble your casserole! In a baking dish, layer half of the crushed Oreos at the bottom. Spread half of the cream cheese mixture over the Oreos. Repeat this process with the remaining Oreos and cream cheese mixture. It’s like building a delicious Oreo tower!
Step 5: Chill and Serve
Finally, drizzle a little milk over the top layer. This adds extra moisture and richness. Cover the dish with plastic wrap and chill it in the refrigerator for at least 2 hours. This step is essential for letting the flavors meld together. When you’re ready to serve, just slice and enjoy your Easy Easter Oreo Cookie Casserole!
Tips for Success
- Use a food processor to crush the Oreos for a finer texture.
- Let the cream cheese sit at room temperature for easier mixing.
- Chill the casserole overnight for even better flavor.
- Experiment with different flavored Oreos for a fun twist.
- Don’t skip the milk drizzle; it enhances the creaminess!
Equipment Needed
- Mixing bowl: A large bowl for combining ingredients. A sturdy pot can work in a pinch.
- Hand mixer or whisk: For blending the cream cheese mixture. A fork can also do the job!
- Baking dish: A 9×9 inch dish is ideal. Any similar-sized dish will work.
- Zip-top bag: Perfect for crushing Oreos. A bowl and rolling pin can substitute.
Variations
- Mint Oreo Version: Swap regular Oreos for mint-flavored ones for a refreshing twist.
- Peanut Butter Delight: Add a layer of peanut butter between the cream cheese mixture for a nutty flavor.
- Fruit Layer: Incorporate fresh berries or banana slices between the layers for a fruity touch.
- Gluten-Free Option: Use gluten-free Oreo cookies to make this dessert suitable for gluten-sensitive guests.
- Vegan Adaptation: Substitute cream cheese with vegan cream cheese and use coconut whipped cream for a dairy-free version.
Serving Suggestions
- Fresh Berries: Serve with a side of strawberries or raspberries for a pop of color and freshness.
- Whipped Cream: Top each slice with extra whipped cream for an indulgent touch.
- Chocolate Drizzle: Drizzle melted chocolate over the casserole for a decadent finish.
- Refreshing Beverages: Pair with iced tea or lemonade to balance the sweetness.
FAQs about Easy Easter Oreo Cookie Casserole
Can I make this Easy Easter Oreo Cookie Casserole ahead of time?
Absolutely! This dessert can be made a day in advance. Just cover it tightly and store it in the refrigerator. The flavors will meld beautifully overnight, making it even more delicious!
How long can I store leftovers?
You can keep any leftovers in the refrigerator for up to 3 days. Just make sure to cover it well to maintain its freshness. But let’s be honest, it’s so good, you might not have any leftovers!
Can I use different types of cookies?
Yes! While Oreos are the star, feel free to experiment with other cookies. Chocolate sandwich cookies or even graham crackers can create a unique twist on this Easy Easter Oreo Cookie Casserole.
Is this dessert suitable for kids?
<pDefinitely! Kids love the creamy layers and crunchy texture. Plus, it’s a fun dessert to make together. Just be prepared for some cookie crumbles flying around!
Can I make this dessert gluten-free?
<pYes! Simply use gluten-free Oreo cookies to make this Easy Easter Oreo Cookie Casserole suitable for those with gluten sensitivities. Everyone can enjoy this delightful treat!
Final Thoughts
Creating this Easy Easter Oreo Cookie Casserole is more than just whipping up a dessert; it’s about bringing joy to your family and friends. The smiles on their faces as they take that first bite are priceless. This recipe is a reminder that delicious treats don’t have to be complicated. With just a few simple ingredients, you can create a delightful dish that sparks happiness and togetherness. So, gather your loved ones, share this sweet creation, and make lasting memories this Easter. Trust me, this casserole will become a cherished tradition in your home!
Print
Easy Easter Oreo Cookie Casserole: A Delightful Treat!
- Prep Time: 20 minutes
- Cook Time: 0 minutes
- Total Time: 2 hours 20 minutes
- Yield: 8 servings 1x
- Category: Dessert
- Method: No-bake
- Cuisine: American
- Diet: Vegetarian
Description
A delicious and easy-to-make dessert perfect for Easter celebrations, featuring layers of Oreo cookies and creamy filling.
Ingredients
- 1 package of Oreo cookies
- 1 cup of whipped cream
- 1 cup of cream cheese
- 1/2 cup of powdered sugar
- 1/2 cup of milk
- 1 teaspoon of vanilla extract
Instructions
- Crush half of the Oreo cookies and set aside.
- In a bowl, mix the cream cheese, powdered sugar, and vanilla extract until smooth.
- Fold in the whipped cream gently.
- In a baking dish, layer half of the crushed Oreos at the bottom.
- Spread half of the cream cheese mixture over the Oreos.
- Repeat the layers with the remaining Oreos and cream cheese mixture.
- Drizzle milk over the top layer.
- Chill in the refrigerator for at least 2 hours before serving.
Notes
- For a festive touch, add colorful sprinkles on top before serving.
- Can be made a day in advance for convenience.
- Store leftovers in the refrigerator for up to 3 days.
Nutrition
- Serving Size: 1 slice
- Calories: 250
- Sugar: 15g
- Sodium: 150mg
- Fat: 12g
- Saturated Fat: 7g
- Unsaturated Fat: 3g
- Trans Fat: 0g
- Carbohydrates: 30g
- Fiber: 1g
- Protein: 3g
- Cholesterol: 30mg