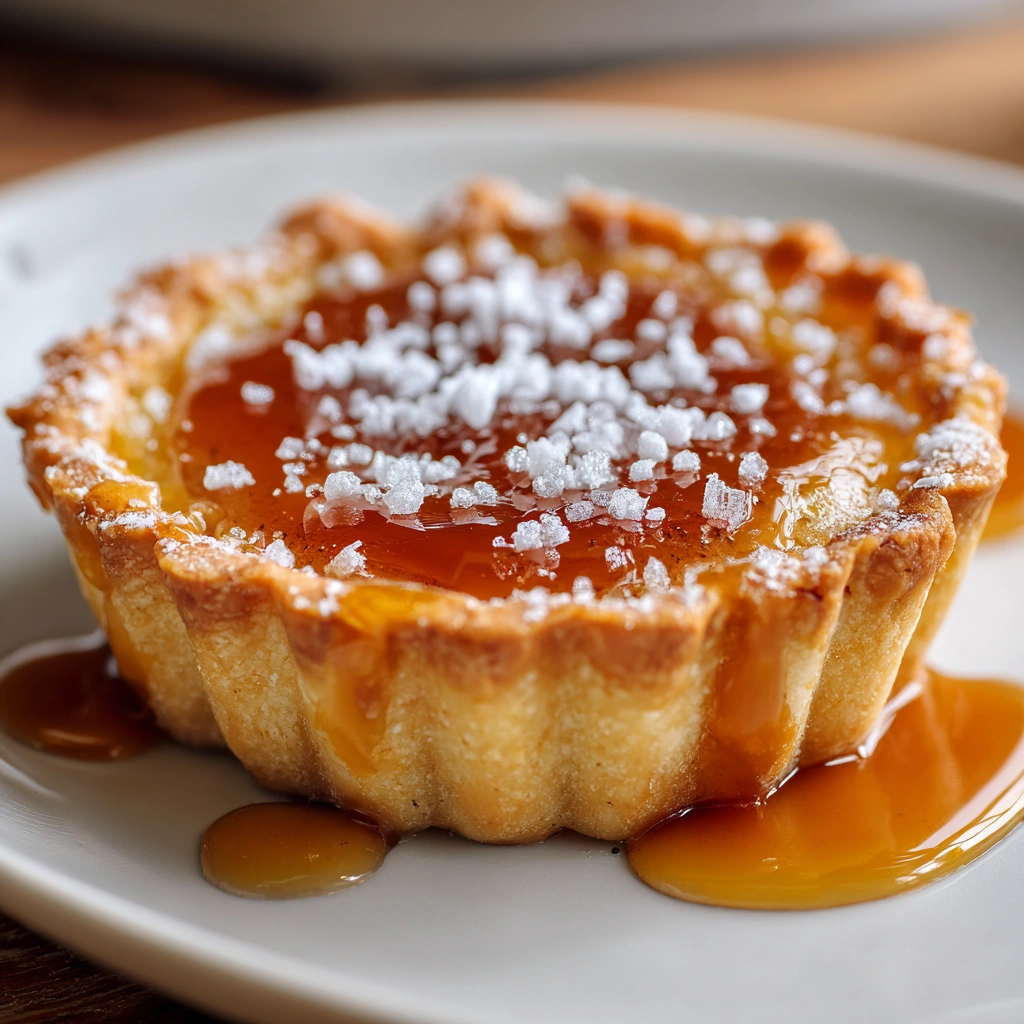
Introduction to Maple Brown Butter Tartlets
As a busy mom, I know how precious time can be, especially when it comes to whipping up something sweet. That’s why I adore these Maple Brown Butter Tartlets! They’re not just a treat; they’re a delightful escape from the everyday hustle. Imagine the rich, nutty flavor of brown butter mingling with the sweet embrace of maple syrup, all nestled in a flaky tart shell. Perfect for impressing guests or simply indulging yourself after a long day, these tartlets are a quick solution that brings joy to any occasion. Trust me, your taste buds will thank you!
Why You’ll Love This Maple Brown Butter Tartlets
These Maple Brown Butter Tartlets are a game-changer for busy lives. They come together quickly, making them perfect for last-minute gatherings or a sweet treat after dinner. The combination of flavors is simply divine, with the nuttiness of brown butter and the sweetness of maple syrup dancing on your palate. Plus, they’re versatile enough to please even the pickiest eaters in your family. You’ll find yourself making these again and again!
Ingredients for Maple Brown Butter Tartlets
Gathering the right ingredients is the first step to creating these delightful Maple Brown Butter Tartlets. Here’s what you’ll need:
- All-purpose flour: This is the base for your tartlet shells, providing structure and a tender crumb.
- Powdered sugar: It adds sweetness and helps create a melt-in-your-mouth texture in the crust.
- Unsalted butter: Browned to perfection, it brings a rich, nutty flavor that elevates the entire dessert.
- Salt: Just a pinch enhances the sweetness and balances the flavors beautifully.
- Maple syrup: The star of the show! It infuses the filling with its sweet, earthy goodness.
- Large egg: This binds the filling together, giving it a lovely custard-like consistency.
- Vanilla extract: A splash of this adds warmth and depth to the flavor profile.
- Chopped pecans (optional): For those who love a little crunch, these add texture and a delightful nutty taste.
For exact measurements, check the bottom of the article where you can find everything listed for easy printing. Feel free to get creative with substitutions! For instance, if you’re out of pecans, walnuts or almonds work just as well. And if you prefer a gluten-free option, you can use a gluten-free flour blend. The possibilities are endless!
How to Make Maple Brown Butter Tartlets
Now that you have your ingredients ready, let’s dive into the delightful process of making these Maple Brown Butter Tartlets. Each step is simple, and I promise you’ll feel like a pro in no time!
Step 1: Preheat the Oven
First things first, preheat your oven to 350°F (175°C). Preheating is crucial because it ensures even baking. If you skip this step, your tartlet shells might not cook properly, leading to a soggy bottom. Nobody wants that!
Step 2: Prepare the Tartlet Shells
In a mixing bowl, combine the all-purpose flour, powdered sugar, and salt. Whisk them together until they’re well blended. Next, pour in the browned butter. This is where the magic happens! Mix everything until it resembles coarse crumbs. It should feel like soft sand between your fingers. Now, press this mixture firmly into your tartlet pans. Make sure to cover the bottom and sides evenly. This will create a lovely, flaky shell.
Step 3: Bake the Tartlet Shells
Pop those tartlet shells into the preheated oven and bake for about 10-12 minutes. You’ll know they’re done when they turn a light golden brown. Keep an eye on them; you don’t want to overbake! Once they’re ready, take them out and let them cool slightly while you prepare the filling.
Step 4: Make the Filling
In another bowl, whisk together the maple syrup, large egg, and vanilla extract. This mixture is the heart of your tartlets! The egg binds everything together, while the maple syrup brings that sweet, earthy flavor. If you’re adding chopped pecans, stir them in now. They’ll add a delightful crunch to your filling.
Step 5: Assemble and Bake
Now it’s time to pour the filling into your cooled tartlet shells. Fill them generously, but don’t overfill! Leave a little space at the top. Return the tartlets to the oven and bake for an additional 15-20 minutes. You’ll know they’re set when the filling is slightly puffed and just firm to the touch.
Step 6: Cool and Serve
Once baked, remove the tartlets from the oven and let them cool in the pans for about 10 minutes. Then, gently transfer them to a wire rack to cool completely. These Maple Brown Butter Tartlets can be served warm or at room temperature. They’re perfect on their own or with a dollop of whipped cream!
Tips for Success
- Always brown the butter slowly over medium heat to avoid burning.
- Use a light touch when pressing the crust into the pans for a flaky texture.
- Let the tartlet shells cool completely before adding the filling for the best results.
- Experiment with different nuts or even chocolate chips for a fun twist!
- Keep an eye on the baking time; ovens can vary!
Equipment Needed
- Tartlet pans: If you don’t have these, a muffin tin works just as well!
- Mixing bowls: A couple of different sizes will make your life easier.
- Whisk: A fork can do the job in a pinch!
- Measuring cups and spoons: Essential for accuracy in baking.
- Wire rack: Perfect for cooling your tartlets evenly.
Variations of Maple Brown Butter Tartlets
- Nut-Free Option: Omit the pecans for a nut-free version. You can replace them with a sprinkle of cinnamon for added flavor.
- Chocolate Lovers: Add mini chocolate chips to the filling for a delightful chocolatey twist that pairs beautifully with maple.
- Fruit-Infused: Incorporate fresh berries or sliced apples into the filling for a fruity burst of flavor.
- Gluten-Free: Substitute all-purpose flour with a gluten-free flour blend to make these tartlets suitable for gluten-sensitive friends.
- Spiced Up: Add a pinch of nutmeg or ginger to the filling for a warm, spiced flavor that’s perfect for fall.
Serving Suggestions for Maple Brown Butter Tartlets
- Pair with a scoop of vanilla ice cream for a delightful contrast of temperatures.
- Serve alongside a warm cup of spiced chai or coffee to enhance the flavors.
- Garnish with a sprinkle of sea salt for a touch of sophistication.
- Top with fresh whipped cream or a dollop of crème fraîche for added creaminess.
- Arrange on a beautiful platter with seasonal fruits for an eye-catching presentation.
FAQs about Maple Brown Butter Tartlets
Can I make Maple Brown Butter Tartlets ahead of time?
Absolutely! You can prepare the tartlet shells and filling in advance. Just store them separately in the fridge. When you’re ready to serve, simply assemble and bake them. They’ll taste just as fresh!
What can I substitute for maple syrup?
If you don’t have maple syrup on hand, you can use honey or agave syrup as a substitute. Keep in mind that the flavor will change slightly, but they’ll still be delicious!
How do I store leftover tartlets?
Store any leftover Maple Brown Butter Tartlets in an airtight container at room temperature for up to three days. If you want to keep them longer, refrigerate them for up to a week.
Can I freeze these tartlets?
Yes, you can freeze the baked tartlets! Just wrap them tightly in plastic wrap and place them in a freezer-safe container. They’ll keep well for up to three months. Thaw them in the fridge before serving.
What’s the best way to serve these tartlets?
These tartlets are delightful on their own, but you can elevate them by serving with a scoop of ice cream or a dollop of whipped cream. A sprinkle of chopped nuts on top adds a lovely crunch!
Final Thoughts
Making Maple Brown Butter Tartlets is more than just baking; it’s about creating sweet moments that linger long after the last bite. The rich, nutty flavor of brown butter combined with the warm sweetness of maple syrup brings a sense of comfort and joy. Whether you’re sharing them with family or savoring one alone with a cup of tea, these tartlets are sure to brighten your day. They remind us that even in our busy lives, there’s always time for a little indulgence. So, roll up your sleeves and enjoy the delightful journey of baking these treats!
Print
Maple Brown Butter Tartlets: A Delectable Treat Awaits!
- Prep Time: 20 minutes
- Cook Time: 30 minutes
- Total Time: 50 minutes
- Yield: 12 tartlets 1x
- Category: Dessert
- Method: Baking
- Cuisine: American
- Diet: Vegetarian
Description
Maple Brown Butter Tartlets are a delightful dessert featuring a rich, nutty flavor from brown butter combined with the sweetness of maple syrup, all encased in a flaky tart shell.
Ingredients
- 1 cup all-purpose flour
- 1/4 cup powdered sugar
- 1/2 cup unsalted butter, browned
- 1/4 teaspoon salt
- 1/4 cup maple syrup
- 1 large egg
- 1 teaspoon vanilla extract
- 1/2 cup chopped pecans (optional)
Instructions
- Preheat the oven to 350°F (175°C).
- In a bowl, mix flour, powdered sugar, and salt.
- Add the browned butter and mix until crumbly.
- Press the mixture into tartlet pans and bake for 10-12 minutes.
- In another bowl, whisk together maple syrup, egg, and vanilla extract.
- Stir in chopped pecans if using.
- Pour the filling into the baked tartlet shells.
- Bake for an additional 15-20 minutes until set.
- Let cool before serving.
Notes
- Ensure the butter is browned but not burnt for the best flavor.
- These tartlets can be served warm or at room temperature.
- Store leftovers in an airtight container for up to 3 days.
Nutrition
- Serving Size: 1 tartlet
- Calories: 180
- Sugar: 10g
- Sodium: 50mg
- Fat: 10g
- Saturated Fat: 6g
- Unsaturated Fat: 4g
- Trans Fat: 0g
- Carbohydrates: 20g
- Fiber: 1g
- Protein: 2g
- Cholesterol: 30mg